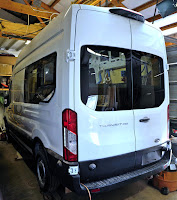
An accessory that, in my book, is worth getting from the factory is windows.
Although
at first blush 3rd party glass looks cheaper than factory's, once
shipment and installation accessories are included, the total costs are similar.
Worse, by the time I was ready to install the windows in warm enough
weather, the urethane glue had to be thrown away and re-ordered as its shelf life is only about a month... 

All
the glass came from Van Windows. The tint on the VWD windows seems
lighter than Ford's. Also, to be confirmed, they might be a bit thinner
and a tad more fragile.
Prices are from Nov'20, and include pro rata shipment:
- CRL Blue Securing Tape 1-1/2" $12
- Trim Lock Edge Molding (per foot) Transit 14-20×40 $99
- 3x Urethane Kit ( 2-Urethanes 1-Primer) $123
- CRL Driver Rear Quarter T-Vent Glass Ford Transit 15-20 $547
- VWD Driver Side Middle Solid Glass Ford Transit 148" 15-20 $236
- VWD Driver Rear Cargo Door Solid Glass Ford Transit $186
- VWD Passenger Rear Cargo Door Solid Glass Ford Transit $186
- VWD Passenger Sliding Door Solid Glass Ford Transit 15-20 $311
- Bauer 14 gauge 5 Amp Metal Shears $69
- Rust-Oleum Protective Enamel Gloss White paint 0.5pint $8
- 2x Laguna 4-2/3 in. 125 lb. Dual Suction Cup Lifter $18
And
the time investment to do a high quality installation is pretty large. Although many youtube
videos show it done fast, if it is your 1st time, and
you're a bit obsessive about long lasting
results, then it'll be a sizable elbow grease + time investment 😓
My process consisted in, for each window:
- Press in a 1/4" round weatherstrip between the van's 2 metal skins, along the opening perimeter's sides & bottom. To prevent metal burs from falling inside the walls
- From inside, drill 1/8" holes every 0.5" along each round corner (or ding the metal with a hammer & center punch)
- From outside, trace with a marker between the drilled holes, and trace the horizontal & vertical lines between the corners
- Make a few large holes next to each other, long enough to poke the shears' jaw through
- Tape all along outside the traced line to avoid scratching the paint with the shears
- From outside, following the traced line and holes, cut the window opening with the shears
- Remove the protective tape
- File the cut edges straight, or round along the corners, where needed
- Debur with a file all along the inside & outside edges
- Vaccum clean the burs along the perimeter while removing the weatherstrip
- Press together the 2 lips of the cut where needed until they're flat and only ~ 1/8" apart (the parallel flat jaws of the Knipex Pliers Wrench do a great job here)
- Apply anti-rust paint on the bare metal all around the opening
- Let the paint fully dry a day or two
- Install
edge molding, pushing it in snuggly, using a rubber hammer where
needed. Tip: once installed, cut it about 1/4" too long. Then hammer
sideways each side of the cut until the ends fit. That compresses the
end cuts tightly against each other, making the seam almost disappear.
- With a Scotch Brite like pad, lightly scratch the paint all around the opening, outside, to provide optimal surface adhesion for the glue. The surface should be matte and no longer glossy
- Clean the opening perimeter thoroughly with isopropyl alcohol (IPA)
- Also clean with IPA the glass's perimeter section that will be glued down
- Install the suction lifters on the outside face of the glass window
- Apply the primer around the opening's perimeter where the bead of urethane will be laid down
- Laid down a bead of urethane, following the manufacturer's instructions. Not too much, not too little. Not too far from, not too close to, the opening & glass edges
- You now have only a couple of minutes left before the glue loses its surface stickiness !
- Press in the window, carefully checking for gaps and alignment all around
- Add securing tape at the top of the glass to prevent it from sliding down
- Maintain pressure on the glass for about 5'
- (nerd
alert!) Now, if you have OCD like me, lay down a bead of black silicon
RTV between the glass edges and the wall, all along the top and sides of
the glass. The bottom is left open for drainage. This will nicely blend
the edges of the glass to the van walls, hide urethane bead
inconsistencies and prevent dirt & grime from settling between the
glass and wall
Now pray that the window won't fall off at the 1st road bump, and will remain vibration proof & leak free for the next 20 years. Repeat the 25 steps for each window...
And
voila, that was super easy and not tiring at all. In other words, I
totally hated that repetitive time-consuming mind numbing high stress
job... 😭
Helpful video from Cycle Van on DIY window installation: https://www.youtube.com/watch?v=5tq6tIZoyow


Comments
Post a Comment